
 ...and they are finished surprisingly fast too! Ok, I cheated a bit. They were assembled and primed earlier, but the actual painting process for all 40 of them was finished in less than two weeks. That's pretty fast for me.
This was an interesting experiment. As I mentioned previously, I don't usually paint to match a specific model. Obviously since these are not real Helghast figures it was impossible to imitate their color scheme exactly, rather I was going for the impression.
I dug up quite a bit of reference material. The color scheme of the Killzone games is very washed out and bleak, lots of grays and muted browns. So are the Helghast, their most distinctive feature being the trademark glowing red eyes.
For the figures I used the Warzone Bauhaus figures I've had for many years but finally assembled and primed last summer. The original Warzone has a distinctive WWI flavor to it (except the parts where it is just plain silly), which does not quite match the Helghast imagery. Still, I decided against removing the helmet spikes or doing any other modifications to the figures, they are built almost vanilla. I cut off the stupid extra bit from the guns, but I would have done that anyway. The Helghast impression would have to be done with the paintjob only.
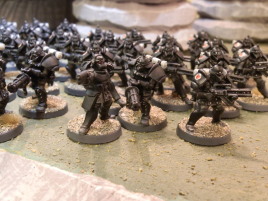
 The usual misconception about the Helghast is that they are wearing all black armor. They're not really. The reference material clearly shows that they have quite a bit of cloth showing and the overall impression is more gray than black. Equipment and armor panels tend to be black.
This actually matches the Bauhaus figures relatively well. They are also clearly wearing armor panels on top of a pretty regular cloth uniform. So I started by painting the uniform light gray and then washing it with Vallejo black wash which leaves a bit dirty looking finish.
Then I tidied up the black bits and gave the whole figure a drybrush in dark gray. After that it was basically a question of filling in the small details - some light silver drybrushing for the gun, silver buttons, belt buckles and armor studs. Straps and other small details in dark gray and it's almost done.
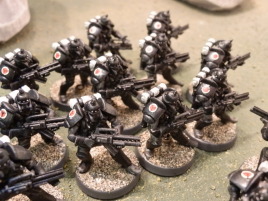
To add some much needed contrast, I painted the blanket rolls white and gave them a light gray wash. Then I added the red eyes but actually getting the glow effect is difficult. With just a few figures I might have tried it with ink washes or something, but I didn't want to risk the bulk production so simple red would have to suffice.
 After varnish, the final touch would be the red patch, another much needed spot of color. I took some 1/300 scale aircraft decals, WWII Japanese hinomarus and stuck them on the left shoulders. Then I added the black Y figure with a technical drawing pen. The downside of this is that the ink is water soluble -- you can't varnish it with a brush on varnish because it will just run. So another whiff of matt varnish was needed.
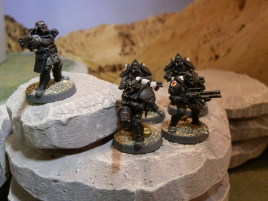
Finally some basic basing with sand, grass tufts and used primers and they were done.
Ladies and gentlemen, I present you: The Baughast
Now, one more to go...
 Sucks!
