 I'm not a big 15mm guy, especially when it comes to infantry. However,
in the past couple of months I just painted over 500 of them without
going any more insane than I already was.
I'm not a big 15mm guy, especially when it comes to infantry. However,
in the past couple of months I just painted over 500 of them without
going any more insane than I already was.
I'm not a big 15mm guy, especially when it comes to infantry. However,
in the past couple of months I just painted over 500 of them without
going any more insane than I already was.
Since I do not greatly enjoy painting 15mm, I took a very pragmatic and production line approach to the problem. With 15mm, you are going for the unit look. While it's cute to display your painting skill with such small models, in practice people do not notice the small details in gaming situations. Also, 15mm figures are often less than stellar casts and quite frankly not worth fixing to the point they could be used for a really good paintjob. And in most cases you need tons and tons of them, spending five hours painting each one is just not an option.
Thus I came up with a process to maximize quality for minimum effort. It is noteworthy that this does not work for everything, but the more leeway you have in selecting color schemes the easier it is. This works wonders with any earth-tone based color scheme. It does not really work with bright colors and even dark blue is a bit difficult.
First you need to select a batch to work on. I found that 30-50 similar figures is a good batch size. It's large enough to get benefits from assembly line methodology but still small enough not to bore too much.
If you have more, split them into several batches. It is better to paint two sets of 30 rather than 60 in go, get numb and bored towards the end and start making mistakes.
Mold lines are the enemy of a good paintjob! But with 15mm you can get away with lot more compared to larger models. Clean away any obvious flash and mold lines. Concentrate on the top parts of the model, especially the helmet because that's the people will be looking at most of the time. No one's going to notice mold lines on the trouser inseam, but a line across an otherwise smooth helmet sticks out like a sore thumb.
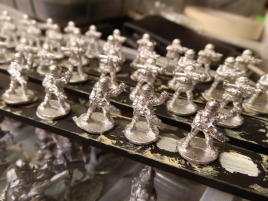
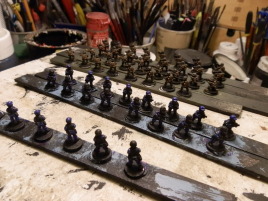
Most 15mm lines actually have very limited pose selection, meaning lots of duplicates. This is good for mass production! Gather the figures in identical poses and stick them on sticks like this, in the same orientation, using blu-tac or similar.
I got my sticks from the Biltema. They're actually sold as kindling and cost next to nothing. But you could substitute anything similar or even make your own.
Do not put the figures too close to each other, you need some space around them to reach everywhere with a brush. Roughly one inch per figure is usually good.
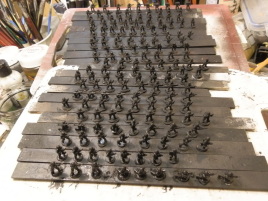
No time to get cute about it, just prime black. I usually do most of the priming with a matte black spray and then finish off with a brush and some black gesso.
I find that it is very difficult to get all the nooks and crannies with a spray can and trying to can easily lead to too much paint on other parts. If you can't get black gesso, you can use regular black acrylic.
You could also prime directly with the main color if you have that in a can, just be careful to cover everything.
This is actually the most important step! If you are painting a historical subject, you have less leeway but with a fictional subject you are free to select the colors that work the best. Even historical uniforms have variance due to different production batches, fading, dirt etc. Always go for the combo with maximum contrast.
You need to select at minimum:
Contrast is king! Make sure there is enough contrast between your base color and the contrast color. If your base a light color, make the contrast color dark and vice versa. You will be putting a uniform wash over everything, which will bring the colors closer to each other.
For minimum effort, select only colors that take a sepia wash well. In practice this is:
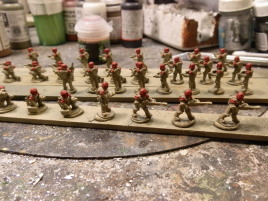
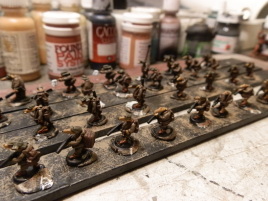
Start by painting the entire figure with the base color. Then add the contrast color and skintone. If you want brown hair, do it now. If not, hair will be black.
Just block in the colors. Try to be neat, but don't worry about small mistakes. Concentrate on the external surfaces, the small nooks and crannies will be handled in the next step anyway.

Apply a heavy sepia wash over the entire figures. GW's Agrax Earthshade is good for this. Your sepia shade needs to be dark enough to shade all the colors on the figures, but light enough not to obscure them.
You may need to apply two coats. Try to avoid excessive pooling.
Paint the gun, helmet visors, hair and other remaining details black. Also paint the integral base black -- you can also use the forthcoming base color if you know it, but black works always. It's much easier to reach between the figures' legs at this stage.
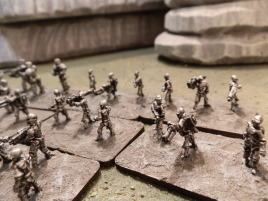
This is optional, but helps pick out details especially on the guns. Apply a gentle drybrush of light grey over the entire figure. Light grey is a great highlight color, because practically anything can appear a bit dusty.
Apply matte varnish as normal. Once it's dry, your figures are ready for basing. Do not take the figures off the painting sticks until the varnish is thoroughly dry.
This is the bare minimum process. Feel free to add a few more details, especially to specialty figures such as RPG gunners. However a couple of special cases are worthy of separate discussion
The problem with blue and grey is that sepia wash makes them look excessively dirty. However, they work well with dark blue and black wash respectively. Dark blue can also work with a black wash if you want a very dark, nearly black result.
If they are your base colors, you need to wash them first, then apply anything requiring a sepia wash (like skintones) and then wash those details separately. Be careful not to spill sepia wash on blue/grey areas.
If they are small detail colors, you need to apply them after the base wash and give them separate spot washes, again being careful not to spill the wash.

White is tricky, but it can be made to work. Probably the easiest way is to paint the white bits light gray, then apply a heavy wetbrush of white over them. Just a little bit of the grey showing through in crevices here and there is enough to create impression of depth.
This is easy. Depending on the amount of glitter you want, you can either drybrush the silver on the black undercoat, or paint the figure silver and then give it a black wash.
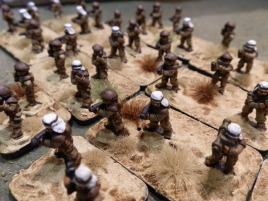
There it is, my method for painting 15mm figures.
One final thing: People new to 15mm, me included, sometimes struggle with the precision required to paint all the small details. The trick is that it's not really required.
Do not try to paint everything cleanly to a T as you would with a larger figure. The wash will make most crevices dark brown anyway, so it's ok to just paint the top of e.g. a strap or belt -- the wash will get the sides.

This work is licensed under a Creative Commons Attribution-NonCommercial-NoDerivs 2.5 License.
Copyright 2003-2021 Mikko Kurki-Suonio
 Sucks!