Big Mama
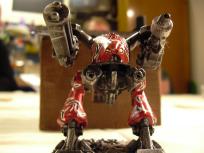
Step 0: Preparation and Assembly
I don't remember who came up with the name originally, but
it stuck. Definitely it wasn't a
Grey
reference, but that certainly fits.
The miniature came originally from the game
Space Crusade,
a sort of joint venture by
Milton Bradley and
Games Workshop.
Unfortunately I forgot to take any pictures of the assembly
stage, but it wasn't much of trouble, just standard wash'n'go.
The model isn't as detailed as it might be, I get the feeling that it was simply
done in the same detail level as the smaller figures in the set, but
never reduced as much in size (plastic masters are always done overscale
and reduced to final size when the molds are made).
For this reason, I drilled out the gun barrels. I think they would have
looked rather silly otherwise. The model came with three optional shoulder
weapons, I chose the gatling and the flamer mainly because I felt the clip
in the missile launcher looked silly. I chose not to smooth the mounting
points to show that the weapons are interchangeable... naawwww, I was just
lazy.
Step 1: Priming
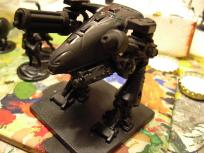 Again, rather simple. I took a can of cheap ass matt black spray, and sprayed the
thing, well, black. After leaving overnight to dry (mostly because the fumes make
my workplace uninhabitable), I took a pot of black paint and touched up those spots
the spray inevitably missed.
Again, rather simple. I took a can of cheap ass matt black spray, and sprayed the
thing, well, black. After leaving overnight to dry (mostly because the fumes make
my workplace uninhabitable), I took a pot of black paint and touched up those spots
the spray inevitably missed.
Most of the time I work from a black undercoat. It does dull the colors and some
colors don't cover well over raw black, but it's so much easier. If you miss a spot,
it's likely to be one of those nasty hard to reach places and basically guaranteed
to be a shadow anyway...
Step 2: Drybrush
Nothing remarkable here, so you're not really missing anything even though
I forgot to take a photo of this stage. Once the model was black, I took
some gunmetal and liberally drybrushed all of it.
Step 3: Primary Colors
I couldn't quite decide how to paint it, so I held a small poll. Here are the results:
- Just drybrush it silver, 33.33%
- Red unz go fasta, 0.00%
- Green, that's what the real military uses, 33.33%
- Brown, that's what the real military uses, 0.00%
- Tiger stripes, 0.00%
- Kinda like African Voodoo Mask, 0.00%
- Blue with white/yellow lightning, 33.33%
- Narn camo, 0.00%
- Anything with a red shoulder, 0.00%
- Miniatures suck, replace it with 50mm cardboard square, 0.00%
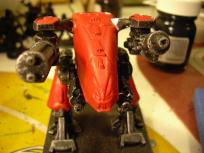 Carefully considering the poll input, I decided to try my hand at
Narn camo. So I decide that panels
and plates should be in color, while exposed machinery would remains a drybrushed
black.
Carefully considering the poll input, I decided to try my hand at
Narn camo. So I decide that panels
and plates should be in color, while exposed machinery would remains a drybrushed
black.
Red is often a rather weak color and doesn't cover well over black. Therefore I apply
a coat of thinned white on the parts that would be red (still visible on one of the
shoulder joins). After that has dried, I grab a pot of deep red and brush away.
Step 4: Wash'n'Go
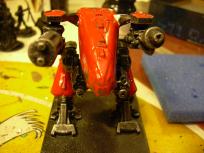 Next comes the wash. Even though most of it is going to be obscured under the camo scheme,
I still wash the red surfaces. Some chestnut ink, straight up. In retrospect, I should have
mixed a darker shade of chestnut for more contrast.
Next comes the wash. Even though most of it is going to be obscured under the camo scheme,
I still wash the red surfaces. Some chestnut ink, straight up. In retrospect, I should have
mixed a darker shade of chestnut for more contrast.
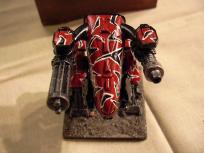
Step 5: Basic Patterns
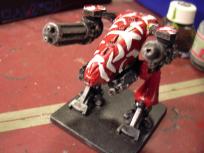 The basic idea in the Narn camo is black irregular shapes, outlined with white, on a deep
red background. We already have the background, so now it's time for the patterns. When
doing patterns like this, it's pure insanity to try to do the outline by really painting
the outline. It is much easier to paint the whole shape (or at least a thick border) in the
outline color, and then block in the inner color just a tad smaller.
The basic idea in the Narn camo is black irregular shapes, outlined with white, on a deep
red background. We already have the background, so now it's time for the patterns. When
doing patterns like this, it's pure insanity to try to do the outline by really painting
the outline. It is much easier to paint the whole shape (or at least a thick border) in the
outline color, and then block in the inner color just a tad smaller.
So that's what we're doing here, starting with the shapes in white. As
B5 fanatics and
people who actually follow links in hypertext
probably already noticed, I botched the job as usual. The shapes are all wrong. That's
what you get for painting without reference material... Oh, well, let's proceed.
Step 6: Detailed Patterns
 Now the tricky part. Break out the revered number 2 synthetic brush and start doing the
inner black of the patterns. When doing stuff like this, you have to keep the paint
flowing. The tiny speck of paint in the tip of a small brush dries surprisingly fast.
Wash your brush often, but remember to dry it also, or your paint will flow all too
well.
Now the tricky part. Break out the revered number 2 synthetic brush and start doing the
inner black of the patterns. When doing stuff like this, you have to keep the paint
flowing. The tiny speck of paint in the tip of a small brush dries surprisingly fast.
Wash your brush often, but remember to dry it also, or your paint will flow all too
well.
Apart from being tedious, there is nothing really hard in this stage. Even though
the CGI models have neat uniform outlines, we're really only shooting for the
impression, so it's not major catastrophe that the outlines are not all the same
thickness. Even though small mistakes at this stage are relatively easy to fix,
strangely I actually did not make any.
Step 7: Final Details
Small final details: Yellow and blacklining for the eyes, silver for the guns,
some dark grey for some of the exposed piping. Oh, and I forgot to photograph this
stage too. Not too much lost, at this point I was getting pretty bored with the
figure and just wanted to get it done. Tried to drybrush the flamer nozzle with black
but it didn't work out too well.
Step 8: Basing
 Rather basic basing, just a base of dark grey paint, then some watered-down
white glue and a dip on some rock dust.
Rather basic basing, just a base of dark grey paint, then some watered-down
white glue and a dip on some rock dust.
Yes, rock dust. Not sand. Rock dust. The traditional way to make rock dust
is as follows:
- Take a rock
- Hit it with a hammer
- Repeat step 2 until rock is dust
- Repeat from step 1 until you have enough dust
Or, if you're lazy like me, you can wait until they have a road construction site
next to your house, sneak in after they've drilled some holes in the rock
to put in the blasting charges and scavenge some dust. I would recommend getting
out before the charge goes off, the extra dust is not worth the effort.
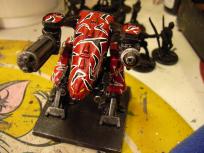
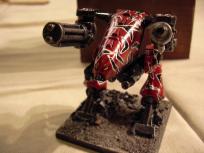
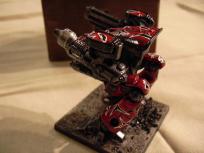
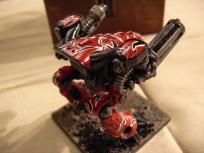
The Finished Product

This work is licensed under a Creative Commons Attribution-NonCommercial-NoDerivs 2.5 License.
Copyright 2003-2021 Mikko Kurki-Suonio
 Sucks!