Project Hippogriff
Introduction
 My 7-year old daughter Saara has recently take a liking to
Harry Potter.
We were reading the third book where Harry gets to ride a hippogriff,
Hiinokka (I have absolutely no idea what it's called in the English
edition), when I got the idea that it would be neat to do a Hippogriff
for her as a Christmas present. I have occasionally done some things
like this as presents, but by and large people don't really appreciate
the work that goes into assembling and painting a miniature.
My 7-year old daughter Saara has recently take a liking to
Harry Potter.
We were reading the third book where Harry gets to ride a hippogriff,
Hiinokka (I have absolutely no idea what it's called in the English
edition), when I got the idea that it would be neat to do a Hippogriff
for her as a Christmas present. I have occasionally done some things
like this as presents, but by and large people don't really appreciate
the work that goes into assembling and painting a miniature.
This is the story of the Hippogriff project.
Acquisition
 First, I needed to obtain a suitable model. For some reason, it seems
that the griffon (green or otherwise) is a more common subject for
gaming miniatures. Perhaps the manufacturers have taken the medieval
wisdom about the difficulty of mating griffons with horses a little
too literally? I found a few examples, but they weren't really to
my liking, so I turned to
The Miniatures
Page.
First, I needed to obtain a suitable model. For some reason, it seems
that the griffon (green or otherwise) is a more common subject for
gaming miniatures. Perhaps the manufacturers have taken the medieval
wisdom about the difficulty of mating griffons with horses a little
too literally? I found a few examples, but they weren't really to
my liking, so I turned to
The Miniatures
Page.
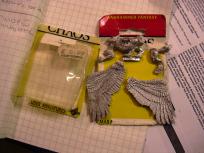
Soon, a helpful fellow offered to trade an old Marauder Miniatures
Hippogriff. A week later, I was the proud owner of this miniture.
Preparation
 Excellent miniature. Good old time Citadel quality, hardly any mold
lines and none of that modern hard non-lead pewter crap. The figure
was very easy to clean up, but unfortunately the
fit of the parts was a bit off.
Excellent miniature. Good old time Citadel quality, hardly any mold
lines and none of that modern hard non-lead pewter crap. The figure
was very easy to clean up, but unfortunately the
fit of the parts was a bit off.
I have never used greenstuff before, but this seemed like a good
application for it. I mixed the putty and stuffed the gaps in the
joints with it. After they were filled, I tried to recreate the fur
texture with a toothpick. In retrospective, and finer modeling tool
would have been better, but the overall result was okay.
Painting
 Starting from a neutral gray primer, I turned to my little-used
collection of Vallejo colors. This would be a subject that would
benefit from a good selection of different shades of brown, and the
Vallejos fit the bill perfectly, even though I usually don't use them
all that much.
Starting from a neutral gray primer, I turned to my little-used
collection of Vallejo colors. This would be a subject that would
benefit from a good selection of different shades of brown, and the
Vallejos fit the bill perfectly, even though I usually don't use them
all that much.
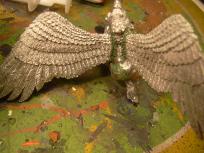
Picked a dark reddish brown mahogany color for the horseflesh, and
lighter sandy shade for the tail and the furry bits. Put that on in a
pretty standard basecoat, washed with brown ink and drybrushed the
highlights on before tackling the real eyecatcher in a model like this
-- the wings.
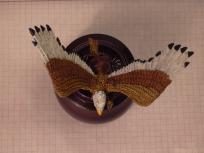
I definitely wanted multi-colored wings. I tried googling for some
reference pictures, but couldn't find a nice view of a wingspan I wanted to
paint. So I modeled the big black-tipped feathers after pictures of
indian headdresses, while I chose two successive tones of brown for
the smaller feathers.
 I left the middle feathers unpainted at first so I could apply two
washes at the same time without risking getting them
intermixed. Sandy brown and white, washed with brown and light grey
respectively. When that dry, I did the middle feathers in a mid-brown
color and picked out the feather tips in black.
I left the middle feathers unpainted at first so I could apply two
washes at the same time without risking getting them
intermixed. Sandy brown and white, washed with brown and light grey
respectively. When that dry, I did the middle feathers in a mid-brown
color and picked out the feather tips in black.
The washes brought out the feather detail pretty nicely but I added
some highlighting anyway. Not really necessary, you're unlikely to
notice the effect from over three inches away.
I chose white for the head, but unfortunately it didn't come out that
well. Then just the beak, tongue and some minor detailing and
corrections and the noble beast was ready for varnishing.
Display Mounting
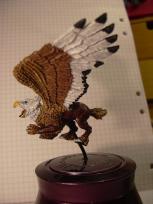
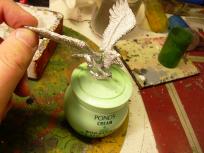 Clearly, the standard cavalry slottabase would not do for this one.
I dug in my bits box and came up with an old hand cream jar. This
would become the new base for the hippogriff. Originally, the beast was posed
to be on the ground, but I thought I'd try to turn it into a flying pose,
as that'd be far more dramatic.
Clearly, the standard cavalry slottabase would not do for this one.
I dug in my bits box and came up with an old hand cream jar. This
would become the new base for the hippogriff. Originally, the beast was posed
to be on the ground, but I thought I'd try to turn it into a flying pose,
as that'd be far more dramatic.
The first thing was to remove the tabs on the feet. I cut and filed
those off and painted the bare spots, including painting fake pads on
the foreleg. At this point I realised the Morrisons had failed their
Mythical Animals 101: The hippogriff is supposed to have bird
claws for forefeet, not the paws this model has. Oh well, too late
to get another model...
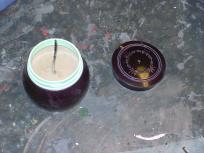 Then I tackled the base. Primed it and sprayed it dark purple, as I just
happened to have that color lying about. Then I grabbed a length of
2mm wire and bent it into a spiral. Inserted the spiral end into the
jar, mixed a batch of
Primodur 100
and poured that in. Primodur is pretty dense, so this would fix the
wire in place and also serve as a counterweight to balance the weight
of the figure. In fact, the base weighs more than the figure, so there
are no outstanding stability issues.
Then I tackled the base. Primed it and sprayed it dark purple, as I just
happened to have that color lying about. Then I grabbed a length of
2mm wire and bent it into a spiral. Inserted the spiral end into the
jar, mixed a batch of
Primodur 100
and poured that in. Primodur is pretty dense, so this would fix the
wire in place and also serve as a counterweight to balance the weight
of the figure. In fact, the base weighs more than the figure, so there
are no outstanding stability issues.
After that, it was just a case of drilling a hole in the jar lid and
the hippogriff and epoxying the whole thing together.
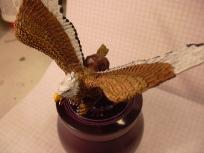
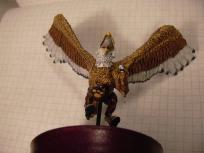
The Finished Model
Here's the finished model. I'm pretty pleased with despite the fact
that Finnish Defence
Forces decided I should take a week off to practice my Axe/Mace
skills, seriously cutting into the available painting time.
More pictures of these figures.
The Results
In a normal situation, I would have called the previous section the
results. However, in this case the real objective was not to produce a
high-quality miniature. Or even a passable quality one, as is more
likely in my case.
The real objective was to make a little girl happy.
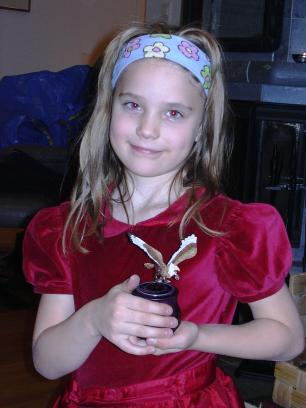
I guess the picture speaks for itself.
Comments
| Hi Makkon |
guest |
Dec 28, 2005 11:35 |
Looks excellent, glad it has been put to good use.
Kreoseus |
| Great Work |
guest |
Dec 28, 2005 20:57 |
I enjoy reading about your color choices and how you put it all together. Congratulations on a fine finished piece that achieved the desired result.
By the way, in English, the hippogriff's name is Buckbeak. |
| great |
guest |
Apr 25, 2006 03:35 |
that was not good one sorry |
| not good |
guest |
Apr 25, 2006 03:35 |
that was ugly sorry i did not like it
|

This work is licensed under a Creative Commons Attribution-NonCommercial-NoDerivs 2.5 License.
Copyright 2003-2021 Mikko Kurki-Suonio
 Sucks!