Land Raider: Resurrection
Introduction
When I started expanding my Purple Hearts Space Marine army, the first
thing I stumbled upon was the lack of vehicles. After profusely cursing myself for not buying
them when three Rhinos were GBP 9.99 and Land Raiders went for GBP 12.99 for two, I got lucky and
spotted a badly broken old style Land Raider for sale. The seller probably thought no one would want
one and I got it for a little less than it had originally cost - one fifth of the current price
(though admittedly the new model is not directly comparable).
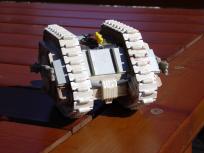
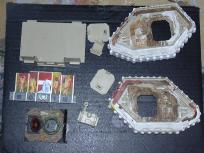 Well, it was cheap but also quite a mess. The guns were missing and so was the front armor plate,
one of the exhaust pipes and various bits and pieces. In addition, it had an uneven coating of
paint-like substance, especially on the tracks. The interior art was an interesting touch, but I decided
to cover it up anyway.
Well, it was cheap but also quite a mess. The guns were missing and so was the front armor plate,
one of the exhaust pipes and various bits and pieces. In addition, it had an uneven coating of
paint-like substance, especially on the tracks. The interior art was an interesting touch, but I decided
to cover it up anyway.
Step 1: Preparation
The first step was to remove the ugly seams that plagued the model. For some curious reason other
people do not seem to regard seams as worth removing... I could have done the Full Monty on it with filler
and stuff, but somehow it didn't seem worth it - as the thing was already partly built it would be somewhat
difficult to clean up everything meticulously. Instead, I decided to go for a rough and ready field
conversion look.
With a combination of knife, file and dremel I removed the most offensive seams and most of the paint
that covered the tracks. Given that the tracks would probably be covered in muck anyway, the
end result was acceptable.
Step 2: Basic Assembly
 The next obvious problem was the guns. The original guns and their mounts were missing. Luckily I had a pair of
twin cannons from a toy I dismantled for parts long ago (I think it was Captain Digi-something). These were
low-definition soft plastic, typical for a toy that is supposed to stand up to some abuse, but they'd have to
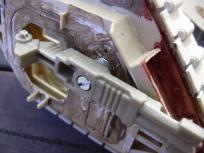
do. The guns were originally attached with a screw, so I decided to use the same basic method, especially
given that the soft plastic is notoriously difficult to glue. I drilled holes
in the Land Raider hull and used a 3mm screw to attach the guns. To properly space them away from the hull,
I added a stack of washers, which I should have glued together but didn't. To finish it off, I added a bit of glue
on the screw to prevent it becoming loose as there would be no way to tighten it once the whole thing was
assembled.
The next obvious problem was the guns. The original guns and their mounts were missing. Luckily I had a pair of
twin cannons from a toy I dismantled for parts long ago (I think it was Captain Digi-something). These were
low-definition soft plastic, typical for a toy that is supposed to stand up to some abuse, but they'd have to
do. The guns were originally attached with a screw, so I decided to use the same basic method, especially
given that the soft plastic is notoriously difficult to glue. I drilled holes
in the Land Raider hull and used a 3mm screw to attach the guns. To properly space them away from the hull,
I added a stack of washers, which I should have glued together but didn't. To finish it off, I added a bit of glue
on the screw to prevent it becoming loose as there would be no way to tighten it once the whole thing was
assembled.
 Then I glued the basic hull together. This was relatively easy, except for the part that the front armor
plate was missing. Luckily I had some bits of LEGO
road lying about. Being too
cheap and lazy to buy real plasticard, this would have to do. I measured the dimensions for the front plate
and cut it from the road piece, and while I was at it, I made the missing top hatch from the same material.
In addition, I made covers for the two strange stowage box like things beside the tracks in the front - even
though later perusal of source material revealed that they probably never had covers to begin with.
Then I glued the basic hull together. This was relatively easy, except for the part that the front armor
plate was missing. Luckily I had some bits of LEGO
road lying about. Being too
cheap and lazy to buy real plasticard, this would have to do. I measured the dimensions for the front plate
and cut it from the road piece, and while I was at it, I made the missing top hatch from the same material.
In addition, I made covers for the two strange stowage box like things beside the tracks in the front - even
though later perusal of source material revealed that they probably never had covers to begin with.
I broke off the the round top hatch and glued it back in closed position. This way I wouldn't have to
paint the interior or find a suitable commander figure...
After glueing on the side doors the basic shape was done. Now onto the fiddly bits...
Step 3: Details
 The first obvious problem was with the armament again. The heavy bolters were missing. Fortunately I had just
finished painting a bunch of marines from the original
Space Crusade
box and these came with a bunch of
optional weapons. If I'd been optimizing, I probably would have used all the heavy bolters to build a
devastator squad, but I was more interested in building a balanced force so I had spare heavy bolters. It was
actually rather simple to carve off the moulded-on hands and glue it on a pintle mount made from a bit
of sprue. The detail was lacking on one side of the weapon, but it would have to do.
The first obvious problem was with the armament again. The heavy bolters were missing. Fortunately I had just
finished painting a bunch of marines from the original
Space Crusade
box and these came with a bunch of
optional weapons. If I'd been optimizing, I probably would have used all the heavy bolters to build a
devastator squad, but I was more interested in building a balanced force so I had spare heavy bolters. It was
actually rather simple to carve off the moulded-on hands and glue it on a pintle mount made from a bit
of sprue. The detail was lacking on one side of the weapon, but it would have to do.
Actually, glueing on the gun at this stage proved to be a mistake, it soon broke off while I was painting
the tank... but it's easy enough to glue back on.
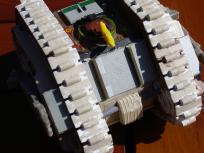
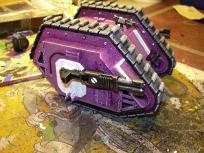
Next problem was the missing exhaust pipe. I made a replacement from a bit of sprue and some washers, but ofcourse
it didn't match the original. In retrospect, I should have replaced them both, but I decided to go for the
hasty field repair look instead. Ok, ok, I was just too lazy to replace a perfectly good part just because
it didn't quite match. In addition, I fixed the broken powerlines on the underbelly and front (or whatever
those pipes are supposed to be) with more bits of sprue and added handles to the top hatch made from an Epic
flagpole.
 Almost done, except I wasn't quite satisfied with it. The new front plate looked very plain and boring, and the
seam between top and rear walls was ugly. More sprue to the rescue, official™
Games Workshop sprue to be precise.
I had to use some generic sprue for the piping, because GW seems to employ sprue with
trapezoidal
cross-section exclusively these days. But for this job the real thing was perfect: I cut two two reinforcing
spars for the front plate and another one to hide the rear seam.
Almost done, except I wasn't quite satisfied with it. The new front plate looked very plain and boring, and the
seam between top and rear walls was ugly. More sprue to the rescue, official™
Games Workshop sprue to be precise.
I had to use some generic sprue for the piping, because GW seems to employ sprue with
trapezoidal
cross-section exclusively these days. But for this job the real thing was perfect: I cut two two reinforcing
spars for the front plate and another one to hide the rear seam.
Remember kids, only use Official™ Games Workshop sprue for your conversions, or your model might
not qualify for the tournaments. The judges can tell!
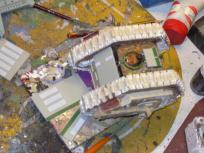
At this stage I was not quite sure whether I wanted to put in a dozer blade or not, that's why it's
not in the pictures.
Whew, finally ready for painting...
Step 4: Painting
 Now, first a small bit of explanation. I have no artistic talent whatsoever. In primary school, my
watercolor works were not hung up on the wall with the rest because they were terminally flooding. If our
great educational system
ever managed to hammer one thing through my thick skull, it was that I had no artistic talent whatsoever.
That, and the ever important difference between a
kolkhoz
and a
sovhoz. I truly pity the souls who have to trudge through
life without this crucial information...
That and ofcourse the importance of
Arhippa Perttunen.
These three nuggets of wisdom have guided me through life.
Now, first a small bit of explanation. I have no artistic talent whatsoever. In primary school, my
watercolor works were not hung up on the wall with the rest because they were terminally flooding. If our
great educational system
ever managed to hammer one thing through my thick skull, it was that I had no artistic talent whatsoever.
That, and the ever important difference between a
kolkhoz
and a
sovhoz. I truly pity the souls who have to trudge through
life without this crucial information...
That and ofcourse the importance of
Arhippa Perttunen.
These three nuggets of wisdom have guided me through life.
But I digress. As I was saying, I readily acknowledge that I have no talent whatsoever. However, through
sheer tenacity and perseverance in 20 years I have learned to apply few tricks in
mechanistic fashion to produce semi-palatable 25/28mm
infantry troopers. All fine and dandy, but whenever I step outside these bounds, e.g. trying to paint in
a different scale or subject, I'm like a fish out of water.
 I was smart enough to know the normal tricks wouldn't work in this case. The Land Raider is just
too big, with too many large flat surfaces. I actually own an airbrush, but I can't use it so I decided
to use spray paints for the
large surfaces. The problem was that despite looking all over, I couldn't find the correct shade
of purple anywhere. Apparently people don't buy purple cars (what's wrong with them?) and the closest
I could get was a deep metallic wine red shade of Citroen,
which
was really too dark and too red. Fortunately, I also had a can of horrible semi-pink "lipstick" paint
stashed away (I have no idea what I was thinking when I bought that one).
I was smart enough to know the normal tricks wouldn't work in this case. The Land Raider is just
too big, with too many large flat surfaces. I actually own an airbrush, but I can't use it so I decided
to use spray paints for the
large surfaces. The problem was that despite looking all over, I couldn't find the correct shade
of purple anywhere. Apparently people don't buy purple cars (what's wrong with them?) and the closest
I could get was a deep metallic wine red shade of Citroen,
which
was really too dark and too red. Fortunately, I also had a can of horrible semi-pink "lipstick" paint
stashed away (I have no idea what I was thinking when I bought that one).
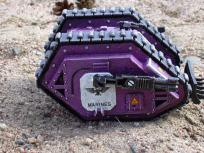
The plan began to formulate in my mind: I would use the wine red as a base and lightly spray the lighter
lipstick shade over it, hoping to produce an average result relatively close to the original Imperial Purple
(which Games Workshop no longer even sells).
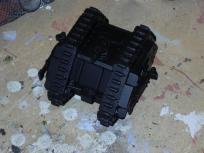
So, first a matt black basecoat, then the metallic wine red base color and finally the a dash of lipstick.
Sounds easy enough, but the first thing I noticed that it was impossible to do an even light coat outdoors
if there was any wind at all. Thus, the final coat had to be applied indoors. Also, the wine red went on
rather thick, obscuring some details (especially the heavy bolter). I can't say if it was my spraying
technique or the metallic paint.
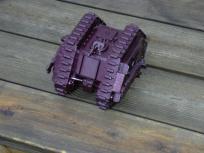
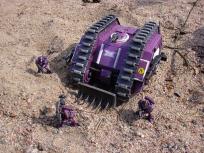
The end result is not the correct shade, but it was reasonably close enough to be usable. Ofcourse, I could
have chickened out and and just painted the tank in gray or generic camouflage scheme, but as my Epic
Land Raiders were already in glorious purple, so would this one. This choice was also made because if I
deviated from the chapter color scheme, I would have to paint the chapter logo on the tank to tie it in
with the troopers - a task I certainly did not fancy undertaking.
Then I repainted the tracks and running wheels black with basic latex paints. Perhaps a bit too thick
for this application, but I was in no mood to spend three pots of miniature paints on the tracks. Then,
a generous drybrush of light gray latex all over the model.
 This defined the basic color scheme, and was actually pretty much how I painted the Epic models. I was getting
a bit ambitious, though. I had added white edging to the latest batch of marines, and wanted to duplicate
this with the Land Raider. Thus I painted the side doors, top hatch rim, engine supports and front
plate reinforcing spars in white and gave them my standard light gray wash.
This defined the basic color scheme, and was actually pretty much how I painted the Epic models. I was getting
a bit ambitious, though. I had added white edging to the latest batch of marines, and wanted to duplicate
this with the Land Raider. Thus I painted the side doors, top hatch rim, engine supports and front
plate reinforcing spars in white and gave them my standard light gray wash.
Then the guns, pipes and some other bits in black, with a light gunmetal drybrush, and that was basically it.
As a final touch, I highlighted the boltheads in silver and painted the lascannon mounting screws white. I had
accidentally dropped some glue on the front power distribution unit (or whatever that bit is supposed to be).
Inspired by a recent visit to the excellent
Armor Museum in Parola
I decided to paint this "hit" in silver with a dash of brown ink.
Step 5: Final Detailing
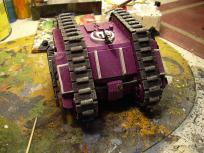
 Time for decals. One imperial eagle on the front plate to hide the fact that it really has very few
details, two on the side doors. Then some text for the side doors from a
Super Cobra kit I never built and
chapter trademark warning signs for the lascannons.
Time for decals. One imperial eagle on the front plate to hide the fact that it really has very few
details, two on the side doors. Then some text for the side doors from a
Super Cobra kit I never built and
chapter trademark warning signs for the lascannons.
Rather than overdo it, I chose to leave it there.
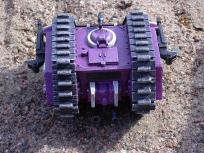
One final touch, though. Though the original dozer blade was gone, I had a spare imperial armor accessory sprue
and miraculously the newer style blade would fit the old Land Raider perfectly! Quickly painting it black
with gunmetal drybrush, I glued it on and gave the tank a final coat of matt varnish.
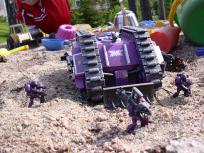
The Finished Product
For more detailed information, please see our guided tour.
Editor's note:
Comments
| Crusader version? |
guest |
Aug 13, 2007 14:56 |
I just picked up my first old school Land Raider
and was wanting to convert to a Crusader...
? is: how do opponents react to the difference
in dimensions (old LR taller, stubbier)? have
you run into any whiners that dont like you gaming
with the old Raider? what are the dimensions to the
newer Raider kit anyway?
any help ty ahead. |

This work is licensed under a Creative Commons Attribution-NonCommercial-NoDerivs 2.5 License.
Copyright 2003-2021 Mikko Kurki-Suonio
 Sucks!