Mishima Ashigaru
Stage 0: Cleanup and Preparation
This is a batch of
WarZone
figures I got cheaply, very cheaply, when the local store was dumping
all miniature lines save
Games Workshop. Sad, really,
but at least I got a boatload of very nice cheap miniatures out of it.
If you're not familiar with Warzone background, Mishima is sort of
samurais-in-space force. Most of their figures are really over the
top and silly, but the cheapest rank and file troopers, the ashigaru,
look almost normal. Except for a stupid spear-bayonet, but fortunately
that's easy to discard.
There isn't a figure born that was ready to be painted
before facing the scalpel. If you ask me, the idea of selling
pre-undercoated but not cleaned miniatures is just
ludicrous. Fortunately,
these castings are pretty clean and they are in the old style
soft alloy. At some point
Target switched to/experimented with
the newer, apparently non-lead alloys. Unfortunately these alloys are
very hard and real chore to clean up. Not that I like cleaning up at all,
but the hard alloy minis really make you wish you were into
model railroads instead.
I chucked the idiotic spear-thingies, cleaned up the castings and epoxied
them to slottabases.
Naturally, I forgot to photograph this stage. But then again, who hasn't
seen bare lead epoxied to slottabase?
Stage 1: Priming
 Ah! The smell of black primer in the air! Time to break out the el Cheapo can of matt
black spray paint. Years in the IT industry have taught me to always buy the cheapest
stuff that fills yours specs, and I extend this to black primer spray. Sure, all
spray paints are not created equal, but for this use pretty much any paint will do.
Ah! The smell of black primer in the air! Time to break out the el Cheapo can of matt
black spray paint. Years in the IT industry have taught me to always buy the cheapest
stuff that fills yours specs, and I extend this to black primer spray. Sure, all
spray paints are not created equal, but for this use pretty much any paint will do.
The spray never hits every spot, or at least I never manage to hit every spot without
literally soaking the miniature with spray. So, I get the trusty crappy well-worn brush
that I use for undercoating (and pretty much everything else these days, being lazy) and
apply some black patches manually.
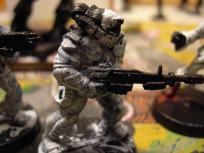
As you can see, I immediately run over my nice black undercoat with a horribly diluted
white sludge. Now, in some circles this might go for a hurried white-wash simulation,
but I was actually trying to give my next color something to hold onto. I had decided
upon a red-back-white scheme for these figures, and red would be the primary base color.
Reds are notoriously hard to put on black undercoat, so I usually do exactly what you
see here: pre-coat the red areas in white.
Stage 2: Primary Colors
 The basic deep red is applied liberally, then washed with darkish brown. Dark brown is such
a handy color for washes that I keep a separate pot of kamikaze brown sludge ready. All leftover
brown washes are dumped into this pot and then it is used straight up for interesting
brown effects.
The basic deep red is applied liberally, then washed with darkish brown. Dark brown is such
a handy color for washes that I keep a separate pot of kamikaze brown sludge ready. All leftover
brown washes are dumped into this pot and then it is used straight up for interesting
brown effects.
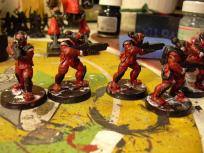 Then some drybrushing. Basically, everything is drybrushed with the original deep
red color. Since the wash darkens the color, this stage returns the original
brightness to raised areas. If I was
Kevin Dallimore, I could just
paint in the shadows and highlights, but I ain't...
Then some drybrushing. Basically, everything is drybrushed with the original deep
red color. Since the wash darkens the color, this stage returns the original
brightness to raised areas. If I was
Kevin Dallimore, I could just
paint in the shadows and highlights, but I ain't...
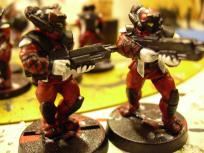
 Next, it's time for the black. Much of the black stuff is already ok, since I tried
to avoid it while doing the red coat, so this is basically just tidying things up...
or would be, if it wasn't for those laces. If you look closely, you'll see that
there's a crisscross of lacework on the forearms. Picking that and some other
assorted black straps is more work for the trusty number 2 synthetic. Usually I work
with cheap and nasty watercolor brushes, but I have bought a couple of synthetic
brushes intended for acrylic paints. They are really good, but me being miserly,
I try the save them for the most difficult precision jobs. In practice this means
I paint most of my stuff with my worn undercoat brush, an old 6/8 double-ender
watercolor brush.
Next, it's time for the black. Much of the black stuff is already ok, since I tried
to avoid it while doing the red coat, so this is basically just tidying things up...
or would be, if it wasn't for those laces. If you look closely, you'll see that
there's a crisscross of lacework on the forearms. Picking that and some other
assorted black straps is more work for the trusty number 2 synthetic. Usually I work
with cheap and nasty watercolor brushes, but I have bought a couple of synthetic
brushes intended for acrylic paints. They are really good, but me being miserly,
I try the save them for the most difficult precision jobs. In practice this means
I paint most of my stuff with my worn undercoat brush, an old 6/8 double-ender
watercolor brush.
In restrospect, the lack of contrast between the black lace and
the deep red suit is mixed blessing: On the other hand my work
isn't so obvious, but on the other, neither are the mistakes. If I'd done the
forearms in e.g. white, any little glitch would jump out real
bad.
I decide not to highlight the black, as these are supposed to
be cheap and nasty rank and file troopers. Besides, the black areas are a tad small
for drybrushing, and as I said, I can't paint in highlights, I simply can't see
where they're supposed to be.
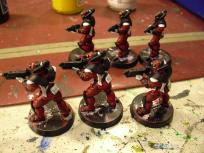
 Finally, the white. Originally, I was going for a red/black scheme, but a bit later I
realised that given the details on these miniatures, a three-tone job would be better
and chose white because it would give good contrast to both red and black.
Finally, the white. Originally, I was going for a red/black scheme, but a bit later I
realised that given the details on these miniatures, a three-tone job would be better
and chose white because it would give good contrast to both red and black.
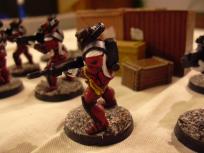
Stage 3: Details
 Not much to do. Yellow eyes, some touchup work and my normal
light grey wash for the white bits. Again I decide against additional
highlights on the small stuff.
Not much to do. Yellow eyes, some touchup work and my normal
light grey wash for the white bits. Again I decide against additional
highlights on the small stuff.
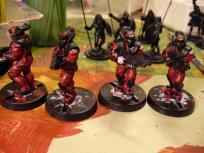
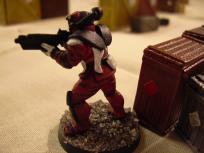
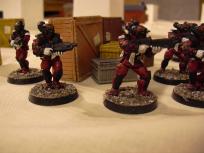
Stage 4: Basing
 Ok, these are ready for basing. I use the same basing scheme as
with Big Mama: Dark grey paint, followed by
diluted PVA glue and some genuine rock dust.
Ok, these are ready for basing. I use the same basing scheme as
with Big Mama: Dark grey paint, followed by
diluted PVA glue and some genuine rock dust.
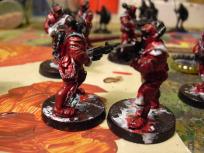
 One final detail: The ammo belt on the LMG guy. Normally, I would
just drybrush or wash items like this, but as an experiment I decided
to torture my good brushes some more. Each cartridge in the belt is individually
highlighted, with shiny brass case and nickel-plated bullet.
One final detail: The ammo belt on the LMG guy. Normally, I would
just drybrush or wash items like this, but as an experiment I decided
to torture my good brushes some more. Each cartridge in the belt is individually
highlighted, with shiny brass case and nickel-plated bullet.
The Finished Product

This work is licensed under a Creative Commons Attribution-NonCommercial-NoDerivs 2.5 License.
Copyright 2003-2021 Mikko Kurki-Suonio

 Sucks!