 Crossfire is one of
the few truly innovative game designs I've come across, and I really
like it (interestingly, I hated
Tactica
so Arty has pretty mixed record in my book).
 Crossfire is one of
the few truly innovative game designs I've come across, and I really
like it (interestingly, I hated
Tactica
so Arty has pretty mixed record in my book).
In addition to choosing the actions most likely to succeed, it's also interesting to see how long you have to keep shooting to produce permanent results (i.e. kills).
The following table shows average kill times (measured as number of fire actions required to remove enemy stand) for various suppress and rally chances. These numbers are obtained using computer simulation. It ignores instant kills (frankly, these are too rare to make any major impact on the numbers anyway) and assumes the opponent uses every chance he gets to rally the suppressed stand.
I know this could also be calculated in an exact fashion instead of relying on computer simulations. However, as nice as it would be, I must admit I was too rusty to actually do it. I never did finish the seminar on stochastic processes... But in any case, the numbers are accurate enough to give a clear picture of the trend. I have rounded the results to the nearest half-round to avoid the illusion of absolute accuracy.
See also: Hit Chances in Crossfire
| Rally Chance | |||||
|---|---|---|---|---|---|
| Suppress Chance | 1/6 | 2/6 | 3/6 | 4/6 | 5/6 |
| 10% | 35.0 | 50.5 | 65.0 | 82.5 | 94.5 |
| 15% | 19.0 | 27.0 | 32.0 | 39.5 | 44.0 |
| 20% | 13.0 | 16.5 | 19.5 | 24.5 | 29.5 |
| 25% | 9.5 | 12.5 | 14.0 | 16.0 | 18.5 |
| 30% | 8.0 | 9.0 | 10.5 | 12.5 | 13.0 |
| 35% | 6.5 | 8.0 | 8.5 | 9.5 | 10.0 |
| 40% | 5.5 | 6.5 | 7.0 | 7.5 | 8.0 |
| 45% | 5.0 | 5.5 | 5.5 | 6.0 | 6.5 |
| 50% | 4.5 | 4.5 | 5.0 | 5.5 | 5.5 |
| 55% | 4.0 | 4.0 | 4.0 | 5.0 | 5.0 |
| 60% | 3.5 | 4.0 | 4.0 | 4.0 | 4.5 |
| 65% | 3.0 | 3.5 | 3.5 | 3.5 | 4.0 |
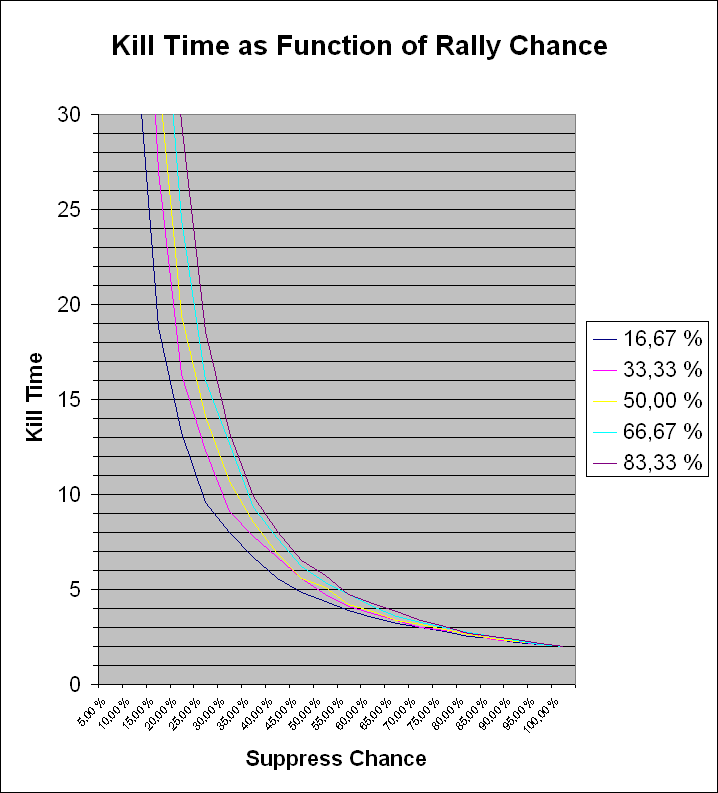
As you can see, it can take a pretty long while to kill anything. The 50% mark is a particularly interesting number, because it represents the maximum firepower crossfire under normal conditions - 3 rifle squads and an attached HMG vs. a target in cover. Anything above 50% is exceptional circumstances.
Another interesting point is the 10% mark. It represents a single squad firing at a target in cover. As you can see, this is pretty futile. You might get a single supression in this way, but generally it's far smarter to use that to bring in more firepower than simply trying to get the second suppression marker.
Also worthy of note is the fact that the quality of enemy troops makes a big difference when the chance to suppress is low, but fades to insignificance in the face of superior firepower as it gets more and more likely to roll two suppression results in succession, never giving the enemy a chance to rally.
Here's a chart of the same thing:

This little Excel-sheet contains the simulator you can play with if you like. It contains VBA code, making it somewhat less portable than I would like.
Caveat emptor: It is entirely possible that I made a mistake here somewhere. Please point it out to me and I'll correct it.

This work is licensed under a Creative Commons Attribution-NonCommercial-NoDerivs 2.5 License.
Copyright 2003-2021 Mikko Kurki-Suonio